Friday, July 31, 2009
What's a good portrait lens?
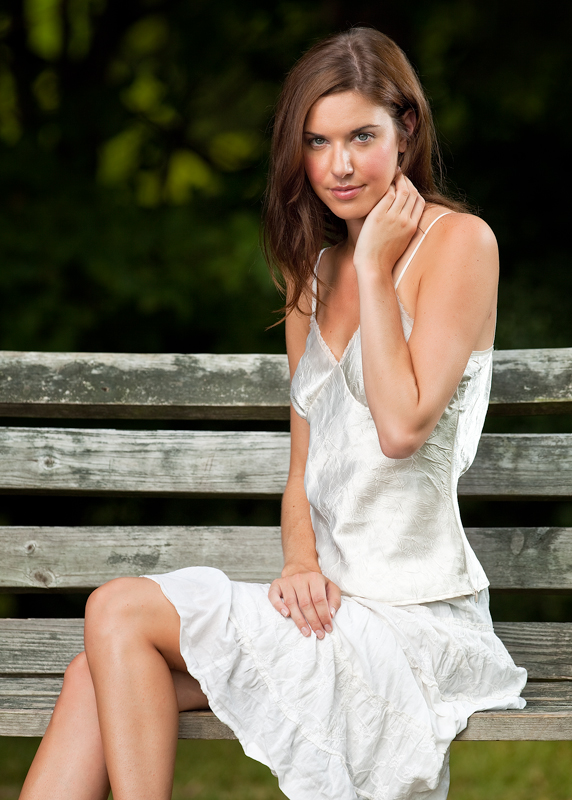
What's a good portrait lens? I get asked this question a lot. There is really no such thing as a "portrait lens." Some lenses are better than others for portrait photography because of their focal length but just about any lens can be used for portraits. Typically 80-135mm is a good focal length range for portraits but sometimes I don't like being typical. This shot of Mandy was taken with a 400mm f/2.8 L IS. 400mm is pretty far from the typical 80-135mm range but the results are magnificent.
Wednesday, July 29, 2009
Lights on / Lights off
Lighting is as much about what you don't light as what you do light. As photographers, we have the ability to orchestrate the viewer's eye with composition, leading lines, and how we light. Light can put the focus on something specific and the absence of light can remove the focus on what's not important.
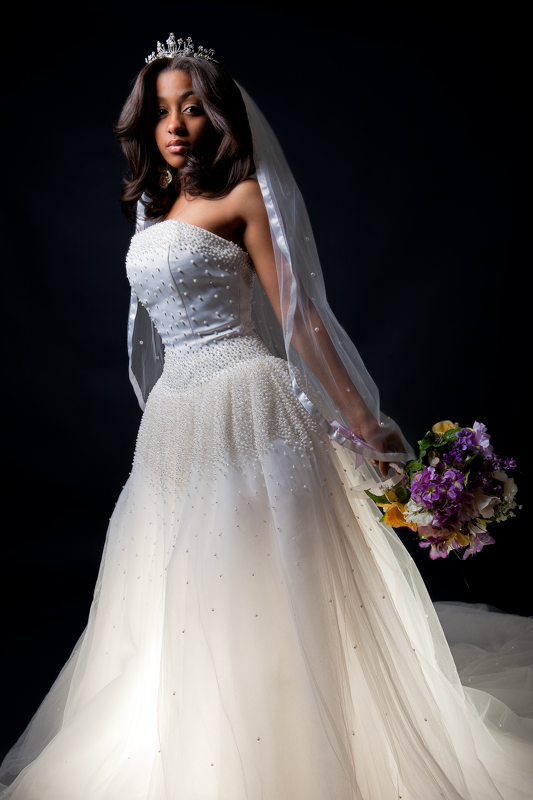
With the image above, I light the model's face with directional side lighting to emphasize her hair, eyes, and lips. I also placed a light underneath her dress to give it a glow and the lead the viewer's eye from her face to something almost as important; her wedding dress. I made sure the light didn't contaminate the background so then only thing that's visible is her.
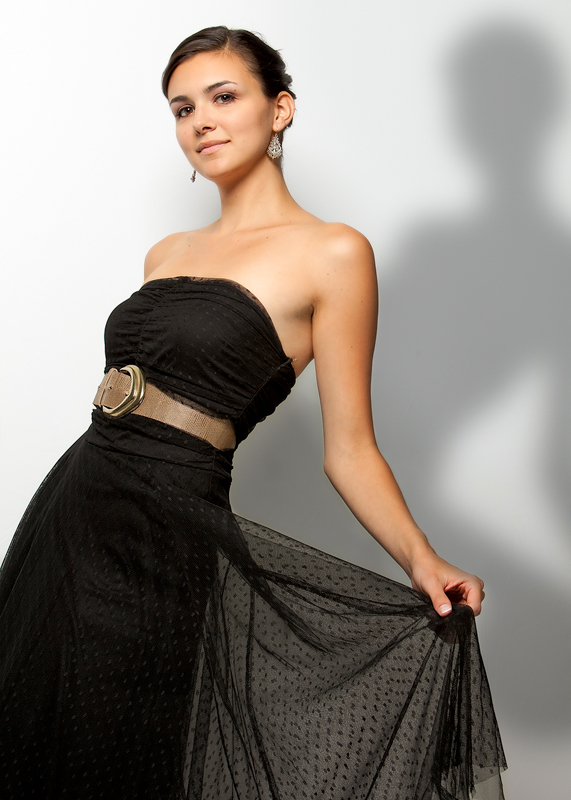
In most cases, defined shadows can be distracting but in this image, the shadows adds a nice artistic element. I used a single strobe inside a beauty dish which puts out light that has a bit more contast that a softbox does.
With the image above, I light the model's face with directional side lighting to emphasize her hair, eyes, and lips. I also placed a light underneath her dress to give it a glow and the lead the viewer's eye from her face to something almost as important; her wedding dress. I made sure the light didn't contaminate the background so then only thing that's visible is her.
In most cases, defined shadows can be distracting but in this image, the shadows adds a nice artistic element. I used a single strobe inside a beauty dish which puts out light that has a bit more contast that a softbox does.
Thursday, July 23, 2009
Sunday, July 19, 2009
Worldwide Photo Walk
The Second Annual Worldwide Photowalk was yeterday. I decided to participate at two locations; Norfolk & Williamsburg. The Norfolk photo walk started at 10AM. Here's a group photo I took of all us.
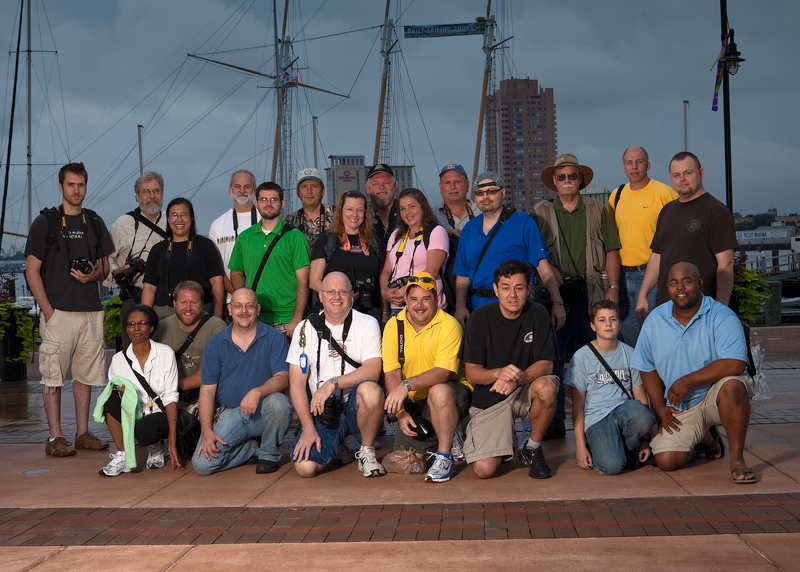
The photo looks like it was taken more like 6AM. That's because I purposefuly underexposed the ambient light and used 3 speedlights to light us.
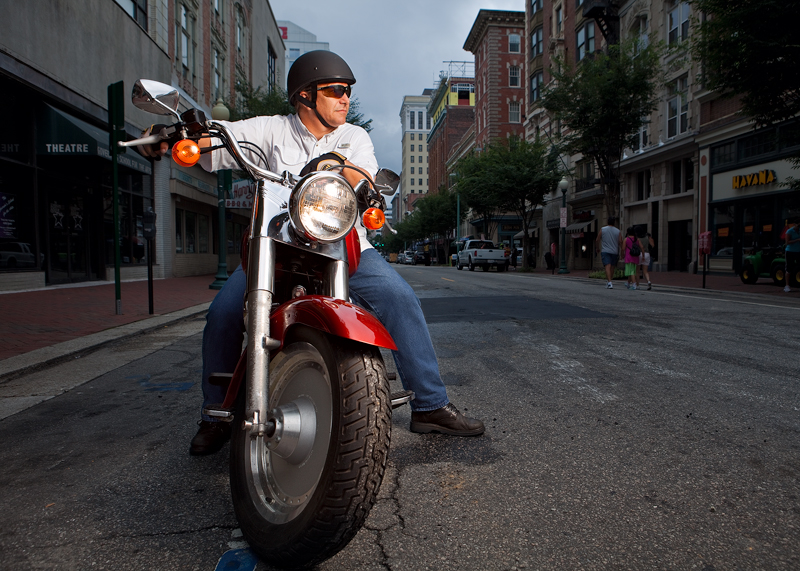
I thought I would do things a little differently this year and incorporate off camera flash in my shots. I spent about two hours with my buddy Mike Preston, just walking through the streets of downtown Norfolk looking for compelling people to photograph.
Here is a man I spotted passing by on his bike who allowed me to photograph him. I used three 580EXIIs mounted on one light stand, gelled with 1/2 CTOs, shooting through an umbrella.
After the photo walk, we had lunch at Gillians in Norfolk; bad food and bad service but getting to meet other photographers was worth it.
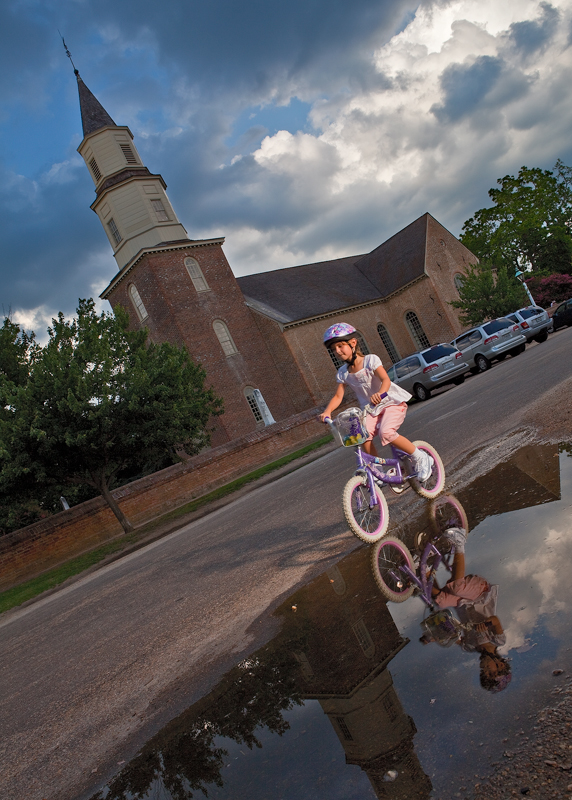
I made it home, changed my clothes, and made it to the Williamsburg walk just in time to be late. I eventuallty met up with the other shooters. Here is one of the shots I took in Williamsburg. I took a similar shot a few months ago but this time I added flash to the moving subject. Again, I purposefuly underexposed the ambient light and cranked up the flashes.
All in all, it was a fun day. I didn't get any award winning shots but it was nice to just get out there and strobe.
The photo looks like it was taken more like 6AM. That's because I purposefuly underexposed the ambient light and used 3 speedlights to light us.
I thought I would do things a little differently this year and incorporate off camera flash in my shots. I spent about two hours with my buddy Mike Preston, just walking through the streets of downtown Norfolk looking for compelling people to photograph.
Here is a man I spotted passing by on his bike who allowed me to photograph him. I used three 580EXIIs mounted on one light stand, gelled with 1/2 CTOs, shooting through an umbrella.
After the photo walk, we had lunch at Gillians in Norfolk; bad food and bad service but getting to meet other photographers was worth it.
I made it home, changed my clothes, and made it to the Williamsburg walk just in time to be late. I eventuallty met up with the other shooters. Here is one of the shots I took in Williamsburg. I took a similar shot a few months ago but this time I added flash to the moving subject. Again, I purposefuly underexposed the ambient light and cranked up the flashes.
All in all, it was a fun day. I didn't get any award winning shots but it was nice to just get out there and strobe.
Tuesday, July 14, 2009
Ticked Off
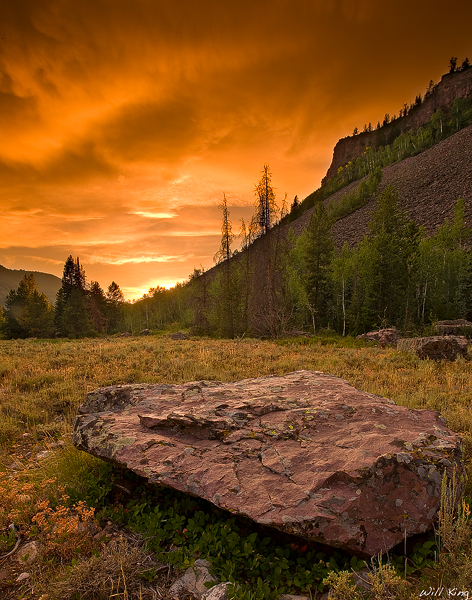
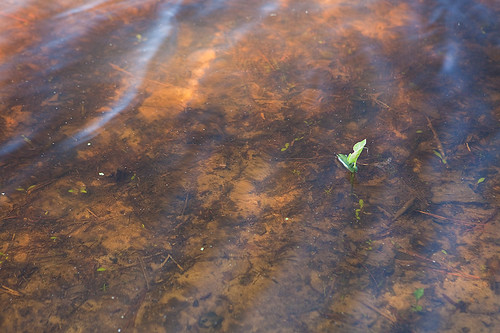
I often go to great lengths to capture a compelling photo. I've been knee deep in fast flowing waters, standing on slippery rocks, trying to balance myself and my tripod/camera at the same time to capture a shot of the Upper Provo River, Utah. Seen here.

I was in a open helicopter (no side windows), leaning out over jagged knife like rocks and cliffs to capture a breathtaking scene of a reflected rainbow in Kauai. Seen here.

But, my scariest moment involving my camera was......
...last night when I found a tick on my back. I was at a local park near dusk photographing Ajike in her wedding dress this past Saturday. There were several times where I placed myself in high grass/weeds, thorn bushes, and layed in the grass to get the right angle and perspective. (She was low, so I got low)
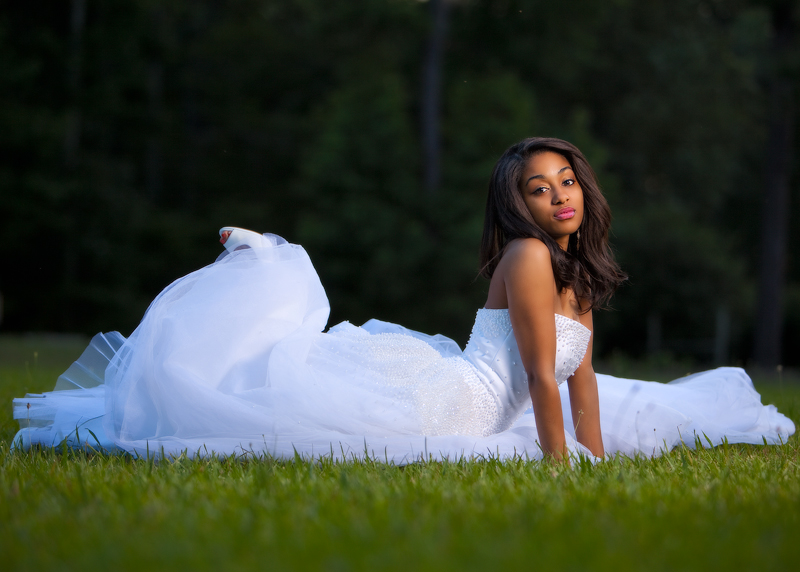
Another shot from the same night

I went home with several mosquito bites all over me. Two days later, after scratching the itchy bites profusely, they turned into scabs. I felt what I thought to be a large scab on my back and checked it in the mirror. I asked my wife to look at it and from her initial reaction I knew it was a tick. ARRRRGGGHHH! I hate ticks! She got the tweezers and safety pin and dug that buried sucker out.
Note to self: Do a thorough check after an outdoor photoshoot
or
stay in the safe confines of a studio!

I was in a open helicopter (no side windows), leaning out over jagged knife like rocks and cliffs to capture a breathtaking scene of a reflected rainbow in Kauai. Seen here.
But, my scariest moment involving my camera was......
...last night when I found a tick on my back. I was at a local park near dusk photographing Ajike in her wedding dress this past Saturday. There were several times where I placed myself in high grass/weeds, thorn bushes, and layed in the grass to get the right angle and perspective. (She was low, so I got low)
Another shot from the same night
I went home with several mosquito bites all over me. Two days later, after scratching the itchy bites profusely, they turned into scabs. I felt what I thought to be a large scab on my back and checked it in the mirror. I asked my wife to look at it and from her initial reaction I knew it was a tick. ARRRRGGGHHH! I hate ticks! She got the tweezers and safety pin and dug that buried sucker out.
Note to self: Do a thorough check after an outdoor photoshoot
or
stay in the safe confines of a studio!
Monday, July 6, 2009
Photographing Landscapes
This is the first topic for the newly formed Hampton Roads Digital Photography Club.
Our plan is to cover a different topic in a classroom environment once a month. The class will be held the first Tuesday of every month, with a photo walk to follow on the second Tuesday. The photo walk will be focused around what was covered in the class. The third Tuesday will be a post processing class. It's intended to cover post processing techniques used to edit and process the photos taken during the photowak the week prior. Keep in mind that if people are not able to attend the Tuesday evening photo walk, they are encouraged to shoot on their own or with a group on another day and use those images for the post processing class.
So without further ado, here is my lesson for
Photographing Landscapes
Camera Settings
One of the most frequently asked questions I get when it comes to any type of photography is "What should the camera settings be?" My answer is always "It depends."
Photographing landscapes is no exception. There are a lot of variables that come into play when photographing landscapes, the biggest being how much light is available.
Exposure Triangle (Aperture, ISO, Shutter Speed)
There are always exceptions to the rule, but typically when shooting landscapes you want to maximize the depth of field. The most effective way to maximize the DoF is to use a small aperture. I like to use a range from f/8 to f/22. This will ensure that most of what's in the frame will be in focus.
For this reason, I always consider aperture the most important ingrediant of the exposure triangle (Aperture, Shutter Speed, ISO).
The ISO should be set to the lowest possible setting.
The shutter speed only plays a supporting role when photographing landscapes. The shutter speed will vary and ultimately be determined by your aperture, ISO, and of course how much light is available in the scene. The only time the shutter speed plays a major role in making your image is when moving water is in the scene. A slow shutter speed can create the milky water effect look.
Other Camera Settings
White Balance is less critical as an in camera setting than other camera settings when shooting in RAW. The white balance can be adjusted in post processing without any damage being done to the image. I usually set my camera's WB to Auto White Balance and make adjustments in post processing as needed.
The camera's metering mode plays a strong role in determing the all overall exposure of the scene. I find that multizone metering is the best choice for photographing landscapes. (Depending who the manufacturer is of your camera, this meter mode might be called Matrix or Evaluative). Multizone metering looks at several parts of the scene and determines the best overall exposure for the whole scene. If you are shooting in full manual, meter modes will not affect the exposure at all.
I always use a single focus point when photographing anything including landscapes. One common misconception of using the multi-focus point or auto-focus point option is that it can focus on different things in the frame. This is false. Cameras can only place precise focus on one area. The depth of field will determine how much of starts to become out of focus. In multi-focus mode, the camera chooses what it thinks is the most interesting part of the scene and attempts to place the focus on that object. This typically is determined contrast, although new facial recognition technology ie becoming popular. When attempting to focus in multi-focus mode, several focus points will blink. The blinking focus points indicate what the camera is attempting to focus on.
Mirror lockup is helpful to create a tack sharp image. DSLRs have a mirror that flips up and back down when taking a shot. The mirror reflects the image coming in from the lens and displays into your viewfinder. When pressing the shutter button, the mirror flips and allows the camera's sensor to campture the image. The flip up causes a minor vibration may reduce the sharpness of the image. Using mirror lockup eliminates the vibration because it flips the mirror up prior to taking the shot.
Equipment Considerations
Obviously you need a camera but what lens should you choose? I prefer wide angle lenses or even ultra-wide angle lenses for landscape photography. I like to take in as much of the scene as I can so the wider the better. Keep in mind that wide angle focal lenghths will make far away objects to appear smaller and might stretch out the out portions of the scene. Also keep in mind that wide angle lenses will suffer from barrel distortion depending on at what angle you point the lens. The further the lens is from being level, the greater the distortion will be.
Fast lenses (lenses capable of large apertures or small f/#) aren't neccesary for landscape photography. See comments above regarding aperture.
IS / VR or any other image stabilization isn't critical for landscape photography because you shouldn't hand hold your camera when shooting landscapes, which leads me to the next piece of equipment.
A sturdy tripod and a good ball head are a must for photographing landscapes. A good tripod should be adjustable, sturdy and stable yet light. A good ball head should allow you to securely mount the camera but also allow you to make adjustments to the pitch and rotation of the camera. They both work together to minimize any camera movement which ultimately results in maximizing sharpness.
A remote shutter release is a cable that attaches to your camera and allows you to take an exposure without pushing the shutter button on the camera. This is helpful because any contact with the camera while the camera is exposing an image can reduce sharness.
Filters can be beneficial when photographing landscapes depending on the kind of filter and what it is used for.
Circular Polarizers are screw on filters that can be used for more than one purpose. CPs can reduce the impact of reflections in the water and actually allow you to see and capture what's under the water.
Without CP filter

With CP filter
They can darken and increase the vibrancy of the sky. They also can increase the color saturation of the scene. Keep in mind that CP filters will impact the exposure by up to 2 stops. CP filters will vary in strength depending on how you rotate it once fully screwed onto the lens.
Neutral Density filters are used primarily to impede light. Impeding light will allow you to slow down the shutter speed without overexposing the image. This is ideal for photography moving water. ND filters can come in different intensities. For example, a 4 stop ND filter will allow you to slow down the shutter speed by 4 stops and get the same exposure.
Graduated Neutral Density filters are helpful when there is a large contrast of light between the sky and foreground typically found at sunrises and sunsets. Most GND filters are square/rectangular pieces of plastic that are placed in front of the lens. The top portion of the filter is neutral gray and gradually goes to clear. This impedes the bright light coming from the sky yet allows all the light present in the foreground thus creating a more even exposure. GND filters come in 1-5 stops.
Other Considerations
These other bits and pieces are a matter of taste and are subject to artistic opinion.
Composition can make or break a landscape photograph. This is how the photographer gets to orchestrate all the elements in the scene which will determine how the audience will view the image. The composition can either allow the viewer's eye to flow from one element to the other or constrict the viewier's eye to one area of the image. There are no absolute rules when it comes to art however, by following some proven guidlines, you can drastically improve the final presentation.

Keep the horizon completely level. Having an unlevel horizon is just unappealing and shows a lack of attention to detail. Enough said!
Include an interesting foreground element to the image.
When photographing the sea, include all three elements: The sand, the sea, and the sky.

Stick around after the sun goes down. Some of the most intense colors are rendered after the sunsets. There is also less of a contrast of light between sky and foreground after the sunsets which will make it easier to capture all the dynamic range.

Where to place the focus? Typcially I place the focus on the lower 1/3 area of the frame. This is also usually where I like to place my "interesting foreground obeject."
There are no film costs. Digital is free. Take multiple shots. Bracket your exposures. This will not only increase your chances of getting a good exposure, it will also allow you to have multiple exposures to use with HDR or exposure blending.
Try different things. Be creative. Have fun!
Our plan is to cover a different topic in a classroom environment once a month. The class will be held the first Tuesday of every month, with a photo walk to follow on the second Tuesday. The photo walk will be focused around what was covered in the class. The third Tuesday will be a post processing class. It's intended to cover post processing techniques used to edit and process the photos taken during the photowak the week prior. Keep in mind that if people are not able to attend the Tuesday evening photo walk, they are encouraged to shoot on their own or with a group on another day and use those images for the post processing class.
So without further ado, here is my lesson for
Photographing Landscapes
Camera Settings
One of the most frequently asked questions I get when it comes to any type of photography is "What should the camera settings be?" My answer is always "It depends."
Photographing landscapes is no exception. There are a lot of variables that come into play when photographing landscapes, the biggest being how much light is available.
Exposure Triangle (Aperture, ISO, Shutter Speed)
There are always exceptions to the rule, but typically when shooting landscapes you want to maximize the depth of field. The most effective way to maximize the DoF is to use a small aperture. I like to use a range from f/8 to f/22. This will ensure that most of what's in the frame will be in focus.
For this reason, I always consider aperture the most important ingrediant of the exposure triangle (Aperture, Shutter Speed, ISO).
The ISO should be set to the lowest possible setting.
The shutter speed only plays a supporting role when photographing landscapes. The shutter speed will vary and ultimately be determined by your aperture, ISO, and of course how much light is available in the scene. The only time the shutter speed plays a major role in making your image is when moving water is in the scene. A slow shutter speed can create the milky water effect look.
Other Camera Settings
White Balance is less critical as an in camera setting than other camera settings when shooting in RAW. The white balance can be adjusted in post processing without any damage being done to the image. I usually set my camera's WB to Auto White Balance and make adjustments in post processing as needed.
The camera's metering mode plays a strong role in determing the all overall exposure of the scene. I find that multizone metering is the best choice for photographing landscapes. (Depending who the manufacturer is of your camera, this meter mode might be called Matrix or Evaluative). Multizone metering looks at several parts of the scene and determines the best overall exposure for the whole scene. If you are shooting in full manual, meter modes will not affect the exposure at all.
I always use a single focus point when photographing anything including landscapes. One common misconception of using the multi-focus point or auto-focus point option is that it can focus on different things in the frame. This is false. Cameras can only place precise focus on one area. The depth of field will determine how much of starts to become out of focus. In multi-focus mode, the camera chooses what it thinks is the most interesting part of the scene and attempts to place the focus on that object. This typically is determined contrast, although new facial recognition technology ie becoming popular. When attempting to focus in multi-focus mode, several focus points will blink. The blinking focus points indicate what the camera is attempting to focus on.
Mirror lockup is helpful to create a tack sharp image. DSLRs have a mirror that flips up and back down when taking a shot. The mirror reflects the image coming in from the lens and displays into your viewfinder. When pressing the shutter button, the mirror flips and allows the camera's sensor to campture the image. The flip up causes a minor vibration may reduce the sharpness of the image. Using mirror lockup eliminates the vibration because it flips the mirror up prior to taking the shot.
Equipment Considerations
Obviously you need a camera but what lens should you choose? I prefer wide angle lenses or even ultra-wide angle lenses for landscape photography. I like to take in as much of the scene as I can so the wider the better. Keep in mind that wide angle focal lenghths will make far away objects to appear smaller and might stretch out the out portions of the scene. Also keep in mind that wide angle lenses will suffer from barrel distortion depending on at what angle you point the lens. The further the lens is from being level, the greater the distortion will be.
Fast lenses (lenses capable of large apertures or small f/#) aren't neccesary for landscape photography. See comments above regarding aperture.
IS / VR or any other image stabilization isn't critical for landscape photography because you shouldn't hand hold your camera when shooting landscapes, which leads me to the next piece of equipment.
A sturdy tripod and a good ball head are a must for photographing landscapes. A good tripod should be adjustable, sturdy and stable yet light. A good ball head should allow you to securely mount the camera but also allow you to make adjustments to the pitch and rotation of the camera. They both work together to minimize any camera movement which ultimately results in maximizing sharpness.
A remote shutter release is a cable that attaches to your camera and allows you to take an exposure without pushing the shutter button on the camera. This is helpful because any contact with the camera while the camera is exposing an image can reduce sharness.
Filters can be beneficial when photographing landscapes depending on the kind of filter and what it is used for.
Circular Polarizers are screw on filters that can be used for more than one purpose. CPs can reduce the impact of reflections in the water and actually allow you to see and capture what's under the water.
Without CP filter
With CP filter
They can darken and increase the vibrancy of the sky. They also can increase the color saturation of the scene. Keep in mind that CP filters will impact the exposure by up to 2 stops. CP filters will vary in strength depending on how you rotate it once fully screwed onto the lens.
Neutral Density filters are used primarily to impede light. Impeding light will allow you to slow down the shutter speed without overexposing the image. This is ideal for photography moving water. ND filters can come in different intensities. For example, a 4 stop ND filter will allow you to slow down the shutter speed by 4 stops and get the same exposure.
Graduated Neutral Density filters are helpful when there is a large contrast of light between the sky and foreground typically found at sunrises and sunsets. Most GND filters are square/rectangular pieces of plastic that are placed in front of the lens. The top portion of the filter is neutral gray and gradually goes to clear. This impedes the bright light coming from the sky yet allows all the light present in the foreground thus creating a more even exposure. GND filters come in 1-5 stops.
Other Considerations
These other bits and pieces are a matter of taste and are subject to artistic opinion.
Composition can make or break a landscape photograph. This is how the photographer gets to orchestrate all the elements in the scene which will determine how the audience will view the image. The composition can either allow the viewer's eye to flow from one element to the other or constrict the viewier's eye to one area of the image. There are no absolute rules when it comes to art however, by following some proven guidlines, you can drastically improve the final presentation.
Keep the horizon completely level. Having an unlevel horizon is just unappealing and shows a lack of attention to detail. Enough said!
Include an interesting foreground element to the image.
When photographing the sea, include all three elements: The sand, the sea, and the sky.
Stick around after the sun goes down. Some of the most intense colors are rendered after the sunsets. There is also less of a contrast of light between sky and foreground after the sunsets which will make it easier to capture all the dynamic range.
Where to place the focus? Typcially I place the focus on the lower 1/3 area of the frame. This is also usually where I like to place my "interesting foreground obeject."
There are no film costs. Digital is free. Take multiple shots. Bracket your exposures. This will not only increase your chances of getting a good exposure, it will also allow you to have multiple exposures to use with HDR or exposure blending.
Try different things. Be creative. Have fun!
Friday, July 3, 2009
McNally, Models, & Modifiers....Oh My!
My buddy Steve and I took a trip to Dobbs Ferry, NY. Dobbs Ferry is about 30 minutes outside of Manhattan......well more like 2 hours outside of Manhattan with NY rush hour traffic. We drove 8 hours, through 5 states, and through a torrential down pour all to see Joe McNally. Was it worth it? ABSOLUTELY!
Anybody that knows anything about photography, more specifically lighting, knows who Joe McNally is. I saw Joe in action a few months ago in Boston at Photoshop World. I was impressed enough to buy his latest book "The Hot Shoe Diaries." The whole title is actually "The Hot Shoe Diaries: Big Light from Small Flashes." As you might guess the book is about getting the most out of small speedlights. The images in the book are just breathtaking. I also decided to buy his first book "The Moment it Clicks." Another display of imagination, creativity, and inginuity.
When Joe annouced that he was conducting a lighting workshop, I immediately made plans to go and I am so glad that I did. Steve and I arrived at a large white building that Joe rents as studio space but is also used as a warehouse. There were about 16 students there and about 9 or 10 of Joe's staff/friends. We were served a light breakfast with coffee. Joe started out by introducing himself and his friends and the students also made brief introductions. There were actually more than one Canon users :) Joe actually was thoughtful enough to bring in Syl Arena from pixsylated.com . Syl is commercial shooter from Cali who also is an expert with Canon gear.
After intros and a quick inspirational slideshow, we immediately starting absorbing the knowledge Joe was dropping. What I loved about Joe's approach to teaching is he does not come across as a "know it all." He's been shooting and lighting for probably longer than I've been alive but he'll be the first to tell you that light can have a life of its own and often time it's unpredictable. Joe never talked about precise formulas, ratios, or even used a light meter. His approach was more of "Let's try this and see what happens." More often than not, the lighting was spot on but there were a few times where it was way off. Joe explained that stuff like this happens and explained how to troubleshoot your way back to good lighting. He often started out with one light and one modifier and slowly built up to more lights and more modifiers until a masterpiece was made. Throughout that process, we ran into real world issues and learned how to stay calm and work ourselves through them.
Not only did we work with small speedlights, we also worked with big studio strobes with ocatboxes as large as the spot on Jupiter. Seeing Joe's plethora of gear was like browsing through the studio section of B&H (actually more like Adorama in Joe's case) We all got a chance to shoot several different lighting schemes with a different model at each station. He then broke us up into groups and allowed us to pick a model and a location to shoot at. This is where Syl was extremely helpful. He was able to answer Canon specific questions. Before I forget, I must apologize to him again. I nearly blinded him by accidently popping three 580EX IIs off at point blank range. Sorry Syl.
All in all, the experience was great. Joe impressed me in more ways than one. He was knowledgable, humble, nice, and funny. He memorized all 16 of the students' names. His staff and friends were all great. Just a tremendous pleasure to work with. The models were great too. Almost forgot. The food was home made and it was delicious. No cold cuts and stale bread. We had eggplant parmesian, chicken and veggie stir fry, rice and beans, salad, and dessert.
Here is a shot of a model I took. Her name is Bethany and she was extremely nice to work with. I used three of my 580EX IIs bare bulb with a 3/4 CTO on each of them.

Here is a shot of Joe at work:

Oh, almost forgot. I've found a way to set off 3 speedlights with one Pocket Wizard. I bought 2 of Lastolite's Triflashes.

I thought it was a pain to connect 3 Pocket Wizards to each of the speedlights. I found a Y adapter at Radioshack that allowed me to connect 2 speedlights to one Pocket Wizard but I still needed another Pocket Wizard for the 3rd speedlight. After doing a lot of searching online, I found this from Belkin:
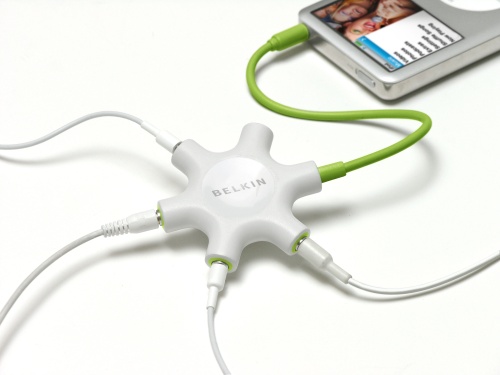
It allows me to connect up to 4 speedlights to 1 Pocket Wizard.
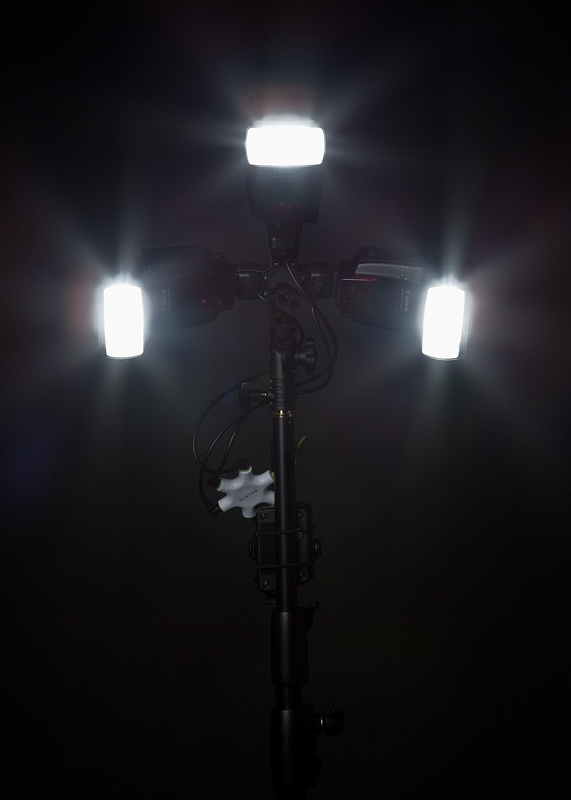
Here's my setup:
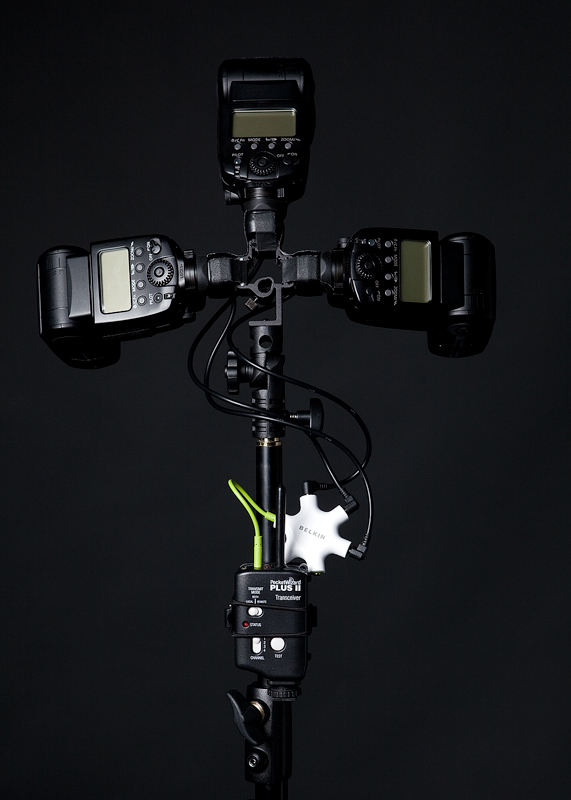
Does it work? Absolutely!
Anybody that knows anything about photography, more specifically lighting, knows who Joe McNally is. I saw Joe in action a few months ago in Boston at Photoshop World. I was impressed enough to buy his latest book "The Hot Shoe Diaries." The whole title is actually "The Hot Shoe Diaries: Big Light from Small Flashes." As you might guess the book is about getting the most out of small speedlights. The images in the book are just breathtaking. I also decided to buy his first book "The Moment it Clicks." Another display of imagination, creativity, and inginuity.
When Joe annouced that he was conducting a lighting workshop, I immediately made plans to go and I am so glad that I did. Steve and I arrived at a large white building that Joe rents as studio space but is also used as a warehouse. There were about 16 students there and about 9 or 10 of Joe's staff/friends. We were served a light breakfast with coffee. Joe started out by introducing himself and his friends and the students also made brief introductions. There were actually more than one Canon users :) Joe actually was thoughtful enough to bring in Syl Arena from pixsylated.com . Syl is commercial shooter from Cali who also is an expert with Canon gear.
After intros and a quick inspirational slideshow, we immediately starting absorbing the knowledge Joe was dropping. What I loved about Joe's approach to teaching is he does not come across as a "know it all." He's been shooting and lighting for probably longer than I've been alive but he'll be the first to tell you that light can have a life of its own and often time it's unpredictable. Joe never talked about precise formulas, ratios, or even used a light meter. His approach was more of "Let's try this and see what happens." More often than not, the lighting was spot on but there were a few times where it was way off. Joe explained that stuff like this happens and explained how to troubleshoot your way back to good lighting. He often started out with one light and one modifier and slowly built up to more lights and more modifiers until a masterpiece was made. Throughout that process, we ran into real world issues and learned how to stay calm and work ourselves through them.
Not only did we work with small speedlights, we also worked with big studio strobes with ocatboxes as large as the spot on Jupiter. Seeing Joe's plethora of gear was like browsing through the studio section of B&H (actually more like Adorama in Joe's case) We all got a chance to shoot several different lighting schemes with a different model at each station. He then broke us up into groups and allowed us to pick a model and a location to shoot at. This is where Syl was extremely helpful. He was able to answer Canon specific questions. Before I forget, I must apologize to him again. I nearly blinded him by accidently popping three 580EX IIs off at point blank range. Sorry Syl.
All in all, the experience was great. Joe impressed me in more ways than one. He was knowledgable, humble, nice, and funny. He memorized all 16 of the students' names. His staff and friends were all great. Just a tremendous pleasure to work with. The models were great too. Almost forgot. The food was home made and it was delicious. No cold cuts and stale bread. We had eggplant parmesian, chicken and veggie stir fry, rice and beans, salad, and dessert.
Here is a shot of a model I took. Her name is Bethany and she was extremely nice to work with. I used three of my 580EX IIs bare bulb with a 3/4 CTO on each of them.
Here is a shot of Joe at work:
Oh, almost forgot. I've found a way to set off 3 speedlights with one Pocket Wizard. I bought 2 of Lastolite's Triflashes.
I thought it was a pain to connect 3 Pocket Wizards to each of the speedlights. I found a Y adapter at Radioshack that allowed me to connect 2 speedlights to one Pocket Wizard but I still needed another Pocket Wizard for the 3rd speedlight. After doing a lot of searching online, I found this from Belkin:
It allows me to connect up to 4 speedlights to 1 Pocket Wizard.
Here's my setup:
Does it work? Absolutely!
Subscribe to:
Posts (Atom)

