Tuesday, December 30, 2008

Tip

Setting a Customer White Balance on 2 Cameras


I often shoot with 2 cameras and one of the cameras usually as my 400mm L f/2.8 IS lens mounted to it:


I use an Expodisc to set a custom white balance. For those who are not familiar with the Expodisc, it's a product that you place on the front of your lens to take a shot to set a custom white balance. I have one that fits over most of my lenses....except for my 400mm, for obvious reasons. So a work around would be to take a target shot with the Expodisc with one camera and place that memory card in the other camera and use it to set the custom white balance.

I know I could easily sync the white balance in Lightroom or Camera RAW but I like to see accurate color while I'm chimping (reviewing my shots).

Thanks to Russ Isabella for giving me this tip.


Sunday, December 28, 2008

Image of the Day

My Favorite Christmas gift


This is a photograph of my wife taken in her parents house (the doorway that leads to the dining room from the kitchen). The only lighting was from the overhead tube lights in the kitchen which normally would have cast a greenish yellow tint. I used an expodisc to color correct.
Made with a 5D Mark II + 70-200mm L f/2.8 IS. (ISO 1250, f/3.5, 1/60) Shot in manuel exposure and custom white balance.

Sunday, December 21, 2008

Image of the Day

Jumper


5D Mark II + 70-200mm L f/2.8 IS (IS)2500, f/2.8, 1/500) no noise reduction

Friday, December 19, 2008

Image of the Day

Quiver


Made with a 1D Mark III + 400mm L f/2.8 IS w/ a 1.4x TC. (ISO200, f/4, 1/800)


Thursday, December 18, 2008

Image of the Day

30 Seconds of the USS Wisconsin


Made with a 1D Mark III + 17-40mm L f/4. (ISO100, f/8, 30 seconds) Coverted to B&W using PSCS4

Tuesday, December 16, 2008

Image of the Day

Intense
W&M vs Rhode Island. Freshman Running Back Jonathan Grimes


Made with a 1D Mark III + 400mm L f/2.8 IS (ISO200, f/3.5, 1/1000)

Image of the Day

Norfolk (pano)


Made with a 1D Mark III + 24-70mm L f/2.8 (10 shots stitched, all ISO100, f/8, 10 second exposure)

Monday, December 15, 2008

Image of the Day

The Dawn of Time


This was made with a 5D + 17-40mm L. (ISO50, f/11, 35 seconds) In Kauai.


Sunday, December 14, 2008

Image of the Day

Close Up


Made with a 50D + 70-200mm L f/2.8 (ISO160, f/4.5, 1/160)


Saturday, December 13, 2008

Image of the Day

Holly Dazzle at City Center


Made with a 1D Mark III + 17-40mm L f/4. (ISO200, f/8, 1 second)

Friday, December 12, 2008

Image of the day

The Cellist


Made with a 50D + 70-200mm L f/2.8 IS. (ISO100, f/4, 1/100. Converted to B&W and added sepia tones)

Thursday, December 11, 2008

Image of the day

I thought I would start a new daily blog titled "Image of the Day" where I post one of my shots. Please feel free to comment and critique.


Made with a 1D Mark III + 24-70mm L f/2.8. (f/8, 8 second exposure, ISO100, @ 24mm)

Monday, December 8, 2008

How shutter speed affects your photos Part II

In my last blog post we talked about how shutter speed affects your photos. In this Part II we will also discuss how shutter speed affects your photos but in a different sense. We know that the camera captures everything while the shutter stays open, thus creating some cool results:


f/8, 13 seconds) The streak of light is a car passing by.


But shutter speed can also create some undesired results as well. Keeping with the same fact that the camera captures everything while the shutter stays open, we can safely state that sharpness is affected by shutter speed. Hand holding your camera can result in blurry or soft photos. Most people get a false sense of confidence when viweing their shots on their camera's LCD. Everything looks great on that 3 inch screen. Then you download all your images to your computer and view them on your monitor. The images still look decent....until you view them at 100% resolution. That's when you can start to see the results of camera shake.

So what is camera shake? Camera shake is what it sounds like. It's your camera shaking, moving, or vibrating. While you may think you have steady hands, they're not as steady as a tripod. Camera shake can be visibly evident at a shutter speed as fast as 1/200, depending on variables like focal legnth, lens type, and how steady or unsteady your hands are.

The last seems pretty obvious. Unsteady hands will cause camera shake but how does focal lenghth and lens type play a factor? Some lenses have a mechanism built in that reduces the results of camera shake. I'm sure the technology varies from lens to lens, but the goal is to be able to capture sharper images at slower shutter speeds by stabilizing the image at the time of capture. Different manufacturers call it different things. Canon has (IS) Image Stabilization. Nikon has (VR) Vibration Reduction.

Now to address focal length. Keep in mind that as the focal length increases so should your shutter speed. Some soures state that if you're hand holding, your shutter speed should never dip below your your focal length. Other sources state that if you're hand holding, your shutter speed should be close to double your focal length to avoid camera shake. Example: If you're shooting at 50mm, your shutter speed should be at least 1/50. Shooting at 200mm, your shutter speed should be at least 1/200.

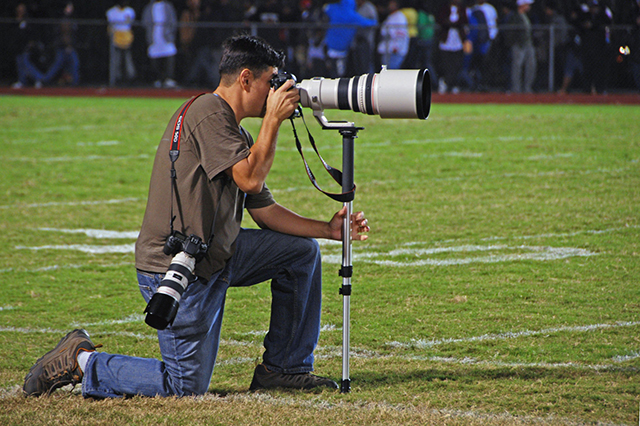
This is why I use a tripod whenever I can. Tripods can be a hassle, heavy, and cumbersome but it will definitely help you get sharper photos. I use a sturdy tripod, ball head, remote cable release, and mirror lockup whenever I can to maximize sharpness. Other factors help contribute to sharp photos as well like choosing the right aperture, but nothing kills sharpness like movement does.

Here are some photos that I took today to show examples. All the shots were taken with a 1D Mark III + 70-200mm L f/2.8 IS.
ISO800, f/4, 1/25.

Hand held with IS turned off.


Hand held with IS turned on.


Tripod mounted.


Tripod mounted, cable release, mirror lockup.


Tripod mounted, cable release, mirror lockup with post process sharpening applied.


As you can see there is a noticeable difference between the hand held IS off and IS on shots. Although the difference is not that visible between the tripod mounted and the tripod mounted+cable release+mirror lockup shots, it's only because of the web sized images and jpg compression. The difference is subtly noticeable when viewed as RAW file at 100% on a high res monitor.
Only the last image posted has any post process sharpening applied.

Although there are sharpening tools in Photoshop and other porgrams, you should never have the mindset of fixing blurry pictures in post processing. Photoshop is an excellent and powerful imaging tool that can do a lot of things like fix exposure mistakes, color corrections, and even delete or create pixels but it cannot unblur a blurry photo, at least not well and not without spending hours on the image. Think of post process sharpening as salt. Salt is added to good food to enhance the flavor just as sharpening is applied to enhance an already sharp image. If you add salt to bad tasting food, it will taste like salty bad tasting food. Try to add sharpening to a blurry photo and it will look like a sharpened blurry photo.

This seems like an article on sharpness but it's really how shutter speed plays a role in how sharp or soft your image will be at various shutter speeds in various situations such as hand holding, some sort of image stabilization, focal length, and the use of a tripod.

Shutter speed has the ability to affect your photos in many ways other than sharpness such as how light or dark (exposure) your image will be. I'll write up an article on that in the near future as Part III.

I hope you found this helpful. As always, I welcome your comments, questions, and input. My next article will be on how to achieve tack sharp images. This article has already addressed how shutter speed affects sharpness. The next one will address other factors, settings, and post processing techniques that will produce razor sharp images.

Wednesday, December 3, 2008

How shutter speed affects your photos Part I

Thanks for visiting my blog. This is my first article. I will attempt to add new articles, tutorials, and discussions every 2-3 weeks as time permits. I welcome your questions, comments, input, and if you're willing to share, your techniques.

I will probably start each blog entry with this generic disclaimer below.


These are some of the steps and techniques that I use. I have learned some of these techniques from various sources and some are techniques that I have created. In the world of photography and Photoshop, there are several ways and methods to achieve certain results. In no way do I think that the methods I use are the only methods or even the right methods. They are methods that I have been accustomed to and that I am able to get my desired results. Photography and post processing techniques are constantly evolving so in many cases my techniques change. I feel that we are all students of light and the digital darkroom so please feel free to add your thoughts, your questions, and if you're willing to share, your techniques.

You have the ability to change settings on your DSRL such as aperture, shutter speed, and ISO just to name a few. What settings you change and how you change them will effect how your image turns out. In this blog entry, we will discuss how shutter speed effects your image. This first installment will be about slow vs fast shutter speeds and what kind of results you can expect by using varying shutter speeds. The second installment will be about the things you can do to achieve tack sharp images; in camera and post processing.

Keep in mind that a photograph is a snapshot of time. It's static and unlike video, it's only one frame. In that one frame, you will be capturing everything during the exposure time. The exposure time is how long your camera's shutter stays open.

Let's use a few photos that have varying shutter speeds to show how they have an effect on motion blur. All these shots were taken with a camera mounted on a tripod.

This is a shot I took last year at Ocean View Pier. It was taken with a 5D and 17-40mm lens @ ISO50, f/16, .5 second shutter speed.


Notice the motion blur of the water, especially on the bottom right side? The water was rushing in pretty fast and the my camera was able to capture that motion during the half second shutter speed. A half second doesn't sound like a long time but think about this; Swing your hand from right to left as fast as you can in front of your face. How long do you think that took? Perhaps 1/3 of a second? Well, if you took a photo of that and the shutter speed was 1/2 of a second, your hand would be a total blur because remember, your shutter captures everything while it's open.

Let's use an extreme example.
I took this shot in Hawaii several minutes after the sunset. I took it with a 5D and 16-35mm. ISO50, f/22, 30 seconds.


Notice how the water looks almost like smoke or fog? This is because the camera's shutter stayed open for 30 seconds, capturing all the movement of the water during that time, thus creating that foggy/smokey look. Why are the rocks sharp and the water blurry? I had my camera mounted on a tripod. The rocks aren't moving nor is my camera. The only thing that was moving was the water and clouds. It wasn't very windy that day otherwise the clouds would have a cool motion blur to them as well.

Now let's look at a photo taken with a fast shutter speed. I say fast because it was taken at 1/500 of a second but actually that's a bit slow in terms of sports photography but when light is scarce and your ISO is almost maxed out, there is really no other choice.
This shot was taken with a 1D Mark III and a 400mm L f/2.8 IS. ISO3200, f/2.8, 1/500.


As you notice, most of this shot is sharp. Both heads and bodies are sharp but look at the receiver's calves. Notice some blur? Well, that's because his calves were running. Yes, his body is attached to his calves and both players are in motion, but his calves were moving back and forth in addition to his forward motion. While 1/500 was fast enough to get his head and body sharp, it was to slow to eliminate motion blur of his calves.

As you can see shutter speed plays a major role in creating your image. Most DSLRs have the ability to snap a shot as fast as 1/8000 of a second. They also have the ability to capture very long exposures, sometimes up to hours, depending on how long the battery will last. I encourage everyone who has a DSLR to experiment. Take it out of auto mode and go into full manual. Try different shutter speeds and see how the effect your images.
Again, if readers have questions or input, please post them.

The second installment about the things you can do to achieve tack sharp images; in camera and post processing will be added in a day or two. This will also be about shutter speed, but also about other settings on your camera that you can change to get sharper images.