Showing posts with label landscapes. Show all posts

Tuesday, June 1, 2010

Photographing Sunrises & Sunsets

Here are a few of my images I have taken this year from various spots in Hampton Roads. All of these images were taken at sunrise. I'll be using these as examples for the class I'm teaching tonight at the Hampton Roads Digital Photography Club.

Most of these images were captured with the following equipment:
5D Mark II ,
Canon 16-35mm f/2.8 L II
s6

s1

s2

s4

s8

s9

s11

s7

Stay tuned and I'll post some notes from the class in the next few days.

Monday, July 6, 2009

Photographing Landscapes

This is the first topic for the newly formed Hampton Roads Digital Photography Club.
Our plan is to cover a different topic in a classroom environment once a month. The class will be held the first Tuesday of every month, with a photo walk to follow on the second Tuesday. The photo walk will be focused around what was covered in the class. The third Tuesday will be a post processing class. It's intended to cover post processing techniques used to edit and process the photos taken during the photowak the week prior. Keep in mind that if people are not able to attend the Tuesday evening photo walk, they are encouraged to shoot on their own or with a group on another day and use those images for the post processing class.

So without further ado, here is my lesson for
Photographing Landscapes


Camera Settings
One of the most frequently asked questions I get when it comes to any type of photography is "What should the camera settings be?" My answer is always "It depends."

Photographing landscapes is no exception. There are a lot of variables that come into play when photographing landscapes, the biggest being how much light is available.

Exposure Triangle (Aperture, ISO, Shutter Speed)

There are always exceptions to the rule, but typically when shooting landscapes you want to maximize the depth of field. The most effective way to maximize the DoF is to use a small aperture. I like to use a range from f/8 to f/22. This will ensure that most of what's in the frame will be in focus.

For this reason, I always consider aperture the most important ingrediant of the exposure triangle (Aperture, Shutter Speed, ISO).

The ISO should be set to the lowest possible setting.

The shutter speed only plays a supporting role when photographing landscapes. The shutter speed will vary and ultimately be determined by your aperture, ISO, and of course how much light is available in the scene. The only time the shutter speed plays a major role in making your image is when moving water is in the scene. A slow shutter speed can create the milky water effect look.

Other Camera Settings

White Balance is less critical as an in camera setting than other camera settings when shooting in RAW. The white balance can be adjusted in post processing without any damage being done to the image. I usually set my camera's WB to Auto White Balance and make adjustments in post processing as needed.

The camera's metering mode plays a strong role in determing the all overall exposure of the scene. I find that multizone metering is the best choice for photographing landscapes. (Depending who the manufacturer is of your camera, this meter mode might be called Matrix or Evaluative). Multizone metering looks at several parts of the scene and determines the best overall exposure for the whole scene. If you are shooting in full manual, meter modes will not affect the exposure at all.

I always use a single focus point when photographing anything including landscapes. One common misconception of using the multi-focus point or auto-focus point option is that it can focus on different things in the frame. This is false. Cameras can only place precise focus on one area. The depth of field will determine how much of starts to become out of focus. In multi-focus mode, the camera chooses what it thinks is the most interesting part of the scene and attempts to place the focus on that object. This typically is determined contrast, although new facial recognition technology ie becoming popular. When attempting to focus in multi-focus mode, several focus points will blink. The blinking focus points indicate what the camera is attempting to focus on.


Mirror lockup is helpful to create a tack sharp image. DSLRs have a mirror that flips up and back down when taking a shot. The mirror reflects the image coming in from the lens and displays into your viewfinder. When pressing the shutter button, the mirror flips and allows the camera's sensor to campture the image. The flip up causes a minor vibration may reduce the sharpness of the image. Using mirror lockup eliminates the vibration because it flips the mirror up prior to taking the shot.


Equipment Considerations
Obviously you need a camera but what lens should you choose? I prefer wide angle lenses or even ultra-wide angle lenses for landscape photography. I like to take in as much of the scene as I can so the wider the better. Keep in mind that wide angle focal lenghths will make far away objects to appear smaller and might stretch out the out portions of the scene. Also keep in mind that wide angle lenses will suffer from barrel distortion depending on at what angle you point the lens. The further the lens is from being level, the greater the distortion will be.
Fast lenses (lenses capable of large apertures or small f/#) aren't neccesary for landscape photography. See comments above regarding aperture.
IS / VR or any other image stabilization isn't critical for landscape photography because you shouldn't hand hold your camera when shooting landscapes, which leads me to the next piece of equipment.

A sturdy tripod and a good ball head are a must for photographing landscapes. A good tripod should be adjustable, sturdy and stable yet light. A good ball head should allow you to securely mount the camera but also allow you to make adjustments to the pitch and rotation of the camera. They both work together to minimize any camera movement which ultimately results in maximizing sharpness.

A remote shutter release is a cable that attaches to your camera and allows you to take an exposure without pushing the shutter button on the camera. This is helpful because any contact with the camera while the camera is exposing an image can reduce sharness.

Filters can be beneficial when photographing landscapes depending on the kind of filter and what it is used for.
Circular Polarizers are screw on filters that can be used for more than one purpose. CPs can reduce the impact of reflections in the water and actually allow you to see and capture what's under the water.

Without CP filter


With CP filter


They can darken and increase the vibrancy of the sky. They also can increase the color saturation of the scene. Keep in mind that CP filters will impact the exposure by up to 2 stops. CP filters will vary in strength depending on how you rotate it once fully screwed onto the lens.

Neutral Density filters are used primarily to impede light. Impeding light will allow you to slow down the shutter speed without overexposing the image. This is ideal for photography moving water. ND filters can come in different intensities. For example, a 4 stop ND filter will allow you to slow down the shutter speed by 4 stops and get the same exposure.

Graduated Neutral Density filters are helpful when there is a large contrast of light between the sky and foreground typically found at sunrises and sunsets. Most GND filters are square/rectangular pieces of plastic that are placed in front of the lens. The top portion of the filter is neutral gray and gradually goes to clear. This impedes the bright light coming from the sky yet allows all the light present in the foreground thus creating a more even exposure. GND filters come in 1-5 stops.

Other Considerations
These other bits and pieces are a matter of taste and are subject to artistic opinion.

Composition can make or break a landscape photograph. This is how the photographer gets to orchestrate all the elements in the scene which will determine how the audience will view the image. The composition can either allow the viewer's eye to flow from one element to the other or constrict the viewier's eye to one area of the image. There are no absolute rules when it comes to art however, by following some proven guidlines, you can drastically improve the final presentation.


Keep the horizon completely level. Having an unlevel horizon is just unappealing and shows a lack of attention to detail. Enough said!

Include an interesting foreground element to the image.

When photographing the sea, include all three elements: The sand, the sea, and the sky.


Stick around after the sun goes down. Some of the most intense colors are rendered after the sunsets. There is also less of a contrast of light between sky and foreground after the sunsets which will make it easier to capture all the dynamic range.


Where to place the focus? Typcially I place the focus on the lower 1/3 area of the frame. This is also usually where I like to place my "interesting foreground obeject."

There are no film costs. Digital is free. Take multiple shots. Bracket your exposures. This will not only increase your chances of getting a good exposure, it will also allow you to have multiple exposures to use with HDR or exposure blending.

Try different things. Be creative. Have fun!

Wednesday, June 24, 2009

Two Images in 1 Photo Contest

Two of my images have been selected as Finalists in Digital Photo Magazine's "Great Escapes" Photo Contest. If you like either one of these images or both, please take a second to vote for them. Thanks.

CLICK HERE TO VOTE


CLICK HERE TO VOTE

Tuesday, March 3, 2009

Photoshop Class: Landscapes Before and After

This is to recap what we did in class and provide a visual before and after.

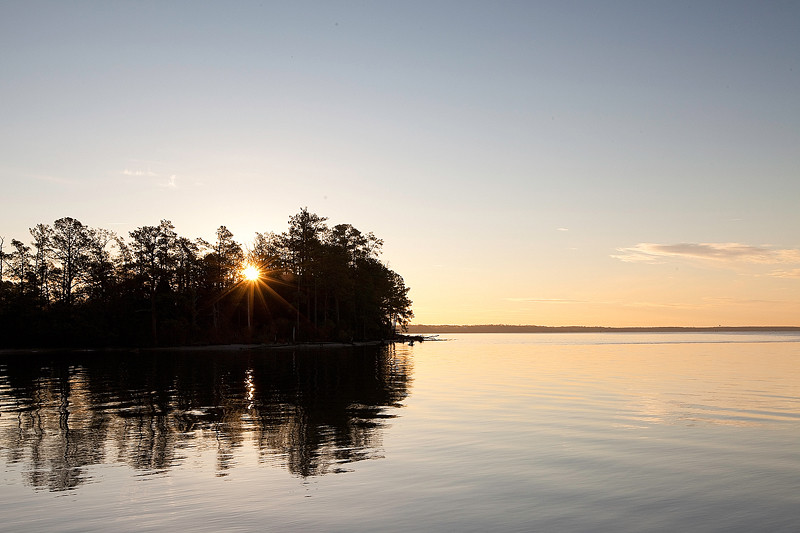
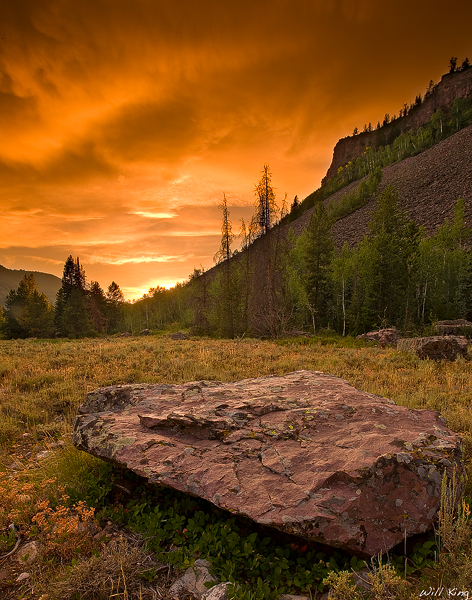
We started out by double processing the same RAW image. Once to bring out the warmth of the sun rays casting through the mountains and the second to get the sky and water to be a vibrant blue.  We did this by changing the color temperature in Adobe Camera Raw. We also increased the saturation and luminance in the HSL/Grayscale tab in Adobe Camera Raw. By bringing the luminance down in the blue channel, we were able to get the richness back in the sky.

Once both versions were open in Photoshop, we copied the cooler version on top of the warmer version as a second layer, added a white layer mask, and painted with a soft black paint brush over the mountain portion of the image to bring out the warmth. We now have the best of both worlds. Warm rays and mountains and cool sky and water.  Flatten image.

We took the image in the LAB color mode and did a curves adjustment on the lightness channel to add some more punch. We also did a curves adjustment on the a and b channels to saturate the colors. These adjustments and every other adjustment was done on a duplicated layer.

We then chose the lightness channel in the Channels palette and made an adjustment to the Highlights/Shadows. This brought some detail back into the dark areas of the mountains.

Our final step in LAB mode was to add more punch by creating a duplicate layer and changing the blend mode to soft light and reducing the opacity to 20%. Flatten image.

We changed our color mode back to RGB. Created a duplicate layer. Filter-Other-High Pass - 12 pixels. Changed the blend mode to soft light.

Used Unsharp Mask to sharpen for print.

Below are the before and after images:

Before:


After:


Please feel free to post questions.
Thanks for attending the class. I hope you got something out of it.

B&H

Labels