Saturday, February 28, 2009

The Docks


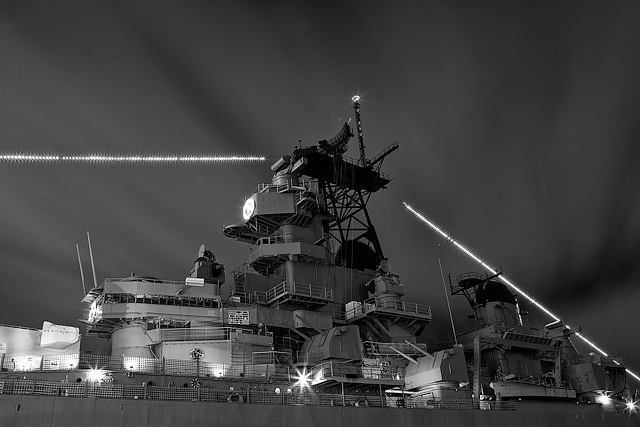
Made with a Canon 5D Mark II 17-40mm L f/4 (ISO100, f/7.1, 30 seconds)

Friday, February 27, 2009

My Beautiful Wife


Made with a Canon 5D Mark II 70-200mm f/2.8 L IS (ISO200, f/5.6, 1/125)
Three 580EX IIs. Two of them were in a shoot through umbrella and the third did not have a modifier on it.
Clam shell lighting with the third light behind her right shoulder.

Wednesday, February 25, 2009

Timing is critical

A split second can determine whether you have a good image or a great image. With the example below, the image is extraordinary because the ball is captured while in mid-air (pure luck on my part) and the receiver's eyes show pure focus. Had this shot been taken 1/2 of a second later, it would not have been as compelling. By the way, he pulled this in for a touchdown.


Made with a Canon 50D 70-200mm f/2.8 L IS (ISO125, f/2.8, 1/1250)


Monday, February 23, 2009

Got Honorable Mention


The February/March issue of PCPhoto is out today and I'm particularly excited about buying it because one of my images made it as Honorable Mention in their This is My World photo contest. I was actually surprised to find out that it made it. I expected from reading the name of the contest “This is My World” that it would feature photos of exotic places with dramatic light. I considered entering some photos I took while in Hawaii because it fit the bill of exotic places with dramatic light but I decided to enter this image. Sure, some of my Hawaii photos are prettier and far more dramatic but I think those images speak more of the beauty of the scenery than my artistic abilities.

My goal as a photographer and as an artist has really changed in the last year or so. In the past, I would photograph the obvious, the pretty, and whatever was the safe bet. I now force myself to pursue the not so obvious, the abstract, and whatever is not the safe bet. I spent over an hour by the puddle, waiting for this Decisive Moment. I’m glad I did. Not because the image made it in a magazine, but rather I did something creative.


Contest Results

Sunday, February 22, 2009

Party Pooper at the Photowalk

Two groups got together tonight (HRTownsqaure & TDPC) for a photo walk in downtown Hampton. I'm an active member of both groups. For the majority of the photo walk, I was not very social and for that I apologize. Right after the group photo, I spotted an interesting location for a shot and was consumed with trying to make a good image rather than using the time to get to know more of the members of each group. Steve was actually nice enough to get some coffee for me but had to yell 3 times from acrosss the street and then called me on my cell to get my attention to come get the coffee which was luke warm by the time I drank it. Photo walks are one of my favorite activities. Hopefully next time I will remember that photo walks are a group activity.


Saturday, February 21, 2009

Minimalist Lighting

I want to thank Mark Warren for opening my eyes to the minimalist lighting mindset. I used to carry around some LARGE portable gear. Seems a bit of a oxymoron.
For a portrait shoot, I would normally lug around two 5 foot softboxes, 3 heavy light stands, portable power (heavy), 2 studio lights, cables, ect....and of course my cameras and lenses.
This image was made with Canon speedlights, 2 very small light stands, 2 shoot through umbrellas, and pocket wizards. I carried all my gear all in one trip without breaking a sweat or my back.
Thanks to Melinda for posing.


Thursday, February 19, 2009

Wildlife theme

Wildlife will eventually be the theme for Tuesday night's Photoshop class. We'll discuss some processing techniques that will really make wildlife beautiful. 


New Photoshop Class


We will no longer be using Scott Kelby's book The 7 Point System. Instead, I will be teaching how to use Photoshop to process your own images from RAW to output. We will cover every aspect of a professional workflow. We will also cover how to correct common issues with digital images such as color casts, flatness, softness, noise, and more. Our goal will be to make ordinary images truly extraordinary with contrast and tonal adjustments, color corrections and saturation, localized enhancements, sharpening, and a few other tips and tricks.


We will have a different theme each time we meet. The first portion of the class will be dedicated to working on one common image which will be provided at the beginning of the class. The second portion of the class will be dedicated to you, working on your own image using the same concepts and techniques.

For Tuesday March 3rd, the theme will be Landscapes.

Future themes will be Portraits, Sports, Wildlife/Nature, Black and White. I will also accept suggestions and requests for future class themes and topics.


Hope to see you there. For more info please visit TDPC


Will King


Monday, February 16, 2009

Tutorial

Night or low light shooting

When one thinks of a good lighting situation for photography, typically the abundance of light comes to mind. In the case of night photography, it's the minimal lighting that makes for compelling images.

In this tutorial, we'll cover the equipment needed, how to meter, and how to compose a good night shot.

I'm probably one of the few photographers I know that carries a tripod just about anywhere that allows a tripod. This is even true when I'm shooting in broad day light. I love tack sharp images and there's no better way to get tack sharp images than to have your camera on a tripod to eliminate camera shake. Of course there are exceptions to my personal tripod rule. I don't use a tripod when shooting sports. I usually shoot with a wide open aperture and shutter speed will be fast enough to eliminate blur from camera shake. This also applies to birds in flight. When I'm shooting portraits I usually use strobes so shutter speed does not really play a factor, thus no blur from camera shake. However, when I'm shooting with a smaller aperture to get a greater depth of field, the shutter speed will be typically slower, therefore there is a greater chance for camera shake. This is especially true for night photography or low light photography. (Low light photography can be anything that has little light such as a wedding in a church with very little ambient light but for this lesson, we are referring to shooting out doors when the sun is setting, rising, or completely gone.)

This is a long winded way to state that you will definitely need a tripod. A good sturdy tripod with a sturdy ball head is recommneded. Some sort of remote shutter release that has a locking mechanism is preferred as well.


A remote shutter release serves 2 purposes. It allows you to trigger your shutter without touching your camera. The less you touch your camera, the better, and yes even pressing the shutter button can introduce blur. The second reason is it allows you to keep your shutter open for longer than 30 seconds. If you plan on keeping your shutter open for longer than 30 seconds, then place the camera in bulb mode. Bulb mode keeps the shutter open for as long as the shutter is pressed down....of course this is down with the locking remote cable release.


If your tripod has a hook at the bottom of the shaft, you can hang your camera bag or a bag of phone books on it. This will increase the stability of the tripod which can be especially helpful on windy nights.


Other equipment that you can use but is not required are various filters. I've used a neutral density filter to slow down the shutter even longer. You can also try a graduated neutral density filter if there is still a hint of light from the setting sun.


Now let's talk about technique. Most DSLRs have a custome setting called Mirror Lockup. This is when the mirror inside the chamber of your camera will flip up until it completes the exposure. The shutter stays closed until the exposure starts, but the mirror will be flipped up. The action of the mirror flipping up causes some vibration in your camera which can lead to minor blur. Activating the mirror lockup will eliminate this vibration.

You also want to turn off the IS or VR (Image Stabilization) or (Vibration Reduction) on your lens. There is a motor that controls the stabilization of the lens and this motor when activated also causes vibration. You won't need IS anyways because your camera will be on a tripod.

Metering for a long exposure night shot without a incident light meter is tricky. This is especially true when there is still some evidence of color from the setting sun or rising sun. Sunlight can still be a factor up to an hour after the sun has set below the horizon. The tricky part is, the intensity of the light will constantly be changing. I often start out with just using Aperture Priority and let the camera do it's job. This offers me a baseline to work with. Try to spot meter on something midtoned. The night sky would be a bad idea because your camera will try to overcompensate and you'll be left with an overexposed shot. Metering on a bright light would also be a bad idea because your camera will underexpose the shot. But hey, we shoot digital so take a shot, wait until it takes the full exposure and chimp. Look at the LCD on your camera and decide how the image looks. The histogram in this case won't be as helpful like it normally would be in normal shooting conditions because you will see spikes on the left (black) and right (white) sides....and that's okay. The spike on the left will represent the night sky and the spike on the right will represent any lights that are in your shot such as a car's headlights or a street light.


I use a smaller aperture when taking night shots because I want to exaggerate the effects of a long shutter such as the clouds rushing through the sky, the headlights of a car streaking by, or the the star flare of stationary lights.


Use the lowest possible ISO you can. Noise can show up very easily in dark areas of the sky so you don't want to exxerbate that with a higher ISO. Remember that you'll be shooting on a tripod so low and slow.


Two other things to add. First, try to add an element of motion to your long exposures. Having an element of motion while everything else is stationary and tack sharp makes for a dynamic image and adds life to the image.


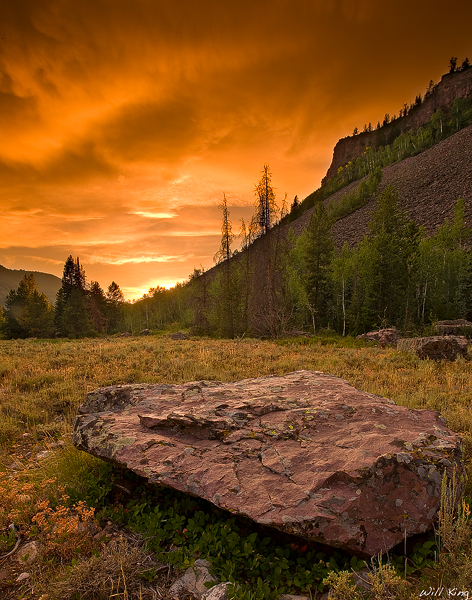
Second, and this can apply for any scenic photo. Try to add a foreground element to your image. This will anchor the image and make for a better composition.

Please feel free to ask questions.


Here are a few examples of my long exposure shots.


Notice all three lights on the street sign. Total accicent but came out sweet.


Thursday, February 12, 2009

Image of the Day

Flipped


This image was made with a 1D Mark III 70-200mm L f/2.8 IS (ISO200, f/6.3, 1/500)
This shot was made at Newport News Park. The sun light was behind Beth and I had Steve hold a large reflector in front of her to illuminate her face.
I pre-metered for her face with the light on her. Beth bent over, Steve held his hand out where her face was going to be and I locked the focus. She then quickly flipped up, whipping her locks in the air.
I chose f/6.3 to ensure her face was sharp and also provide a little more leeway in case her face wasn't in the exact location of the focus plane. I wanted to go with a fast shutter to make sure I eliminated any motion blur on her face but keep a little motion blur in her hair.


Monday, February 9, 2009

Tip

Photographing the Sea

Capturing a dramatic seascape shot can present some unique challenges but by following a few guidelines, you can come away with some magical images.

First you want to consider a good composition. This will be different for every scene as there will be different elements in every scene. The key is to include those elements in your shot and balance them in the composition.

A good starting point is composing for rule of thirds. Yes rules are meant to be broken, but in most cases for landscape and seascape photography, the rule of thirds really works well. I usually try to place my horizon line in the upper thirds level and the brightest part of the sky in the upper thirds on the left or right quadrant. I also like including all 3 major elements in my shots; sky, sea, and sand.

One huge mistake I often see people make is placing the sun dead center and the horizon in the middle. This might seem like a good idea when looking through the viewfinder but when looking at the photo, it creates a bulleyes effect. Almost like a dart board. The eyes will be drawn in the center and will not be compelled to move around the image.

Another common mistake often made is an unlevel horizon. I use a hotshoe level to make sure my camera is completely level and if for some reason my shot comes out unlevel, I make sure I rotate the image to ensure it feels and looks balanced.

Try to find an interesting foreground object to anchor the composition. More than likely, you will have a dramatic sky. This will draw the viewer’s eye to the sky. You’ll want to add something interesting to the foreground to make sure the viewer’s eye is pulled their as well. The goal is to have a well balanced composition that leads the viewer’s eye flowing from one element to the other.

To add more drama to your shot, try to get some of the action that the sea is displaying. Wait until a wave sweeps in or splashes up when taking the shot.


Friday, February 6, 2009

Image of the Day

Burst


This is a manual exposure blend of two shots.

Wednesday, February 4, 2009

Image of the Day

Golden Rays of Paradise


Made with a 1D Mark III 24-70mm L f/2.8. (ISO250, f/5.6, 1/160)
I used a circular polarizer filter to saturate the light and reduce the harsh light. Used various blend modes and layer masks to properly present the dramatic light that was being displayed.

Monday, February 2, 2009

NAPP's Editor's Choice

I am honored to say that this image was selected as NAPP's Editor's Choice for this week.


If you're into photography and Photoshop, NAPP (National Association of Photoshop Professionals) is a great place to learn and get inspired. I've only been into photography and Photoshop for a little over 3 years but I've come a long way because of all the information and knowledge I soak up from all the NAPP avenues: Books and DVDs, Photoshop User Magazine, kelbytraining.com, NAPP's website and especially their forum. If you own Photoshop, you really should consider a NAPP membership.